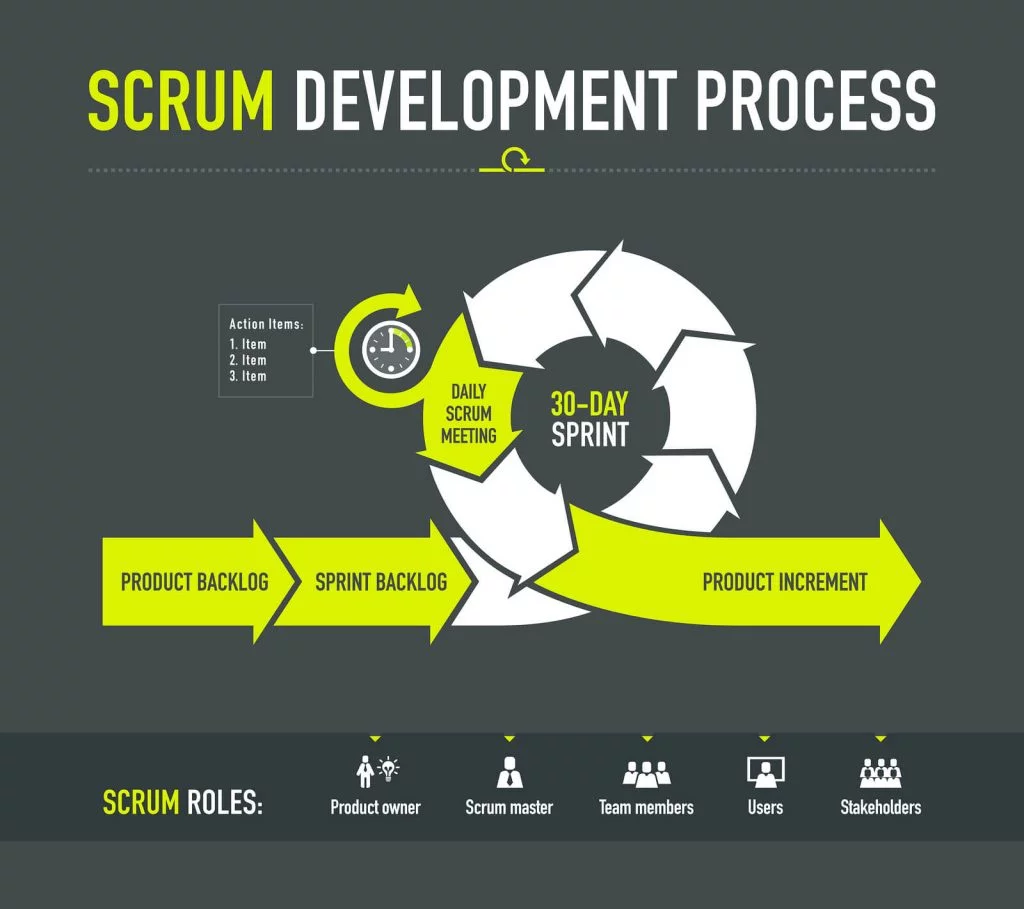
Key Insights & Takeaways
- Metahumans were not initially built for gameplay — integrating them into games requires specific steps Unreal doesn’t handle natively.
- Unreal Engine 5.6 simplifies the process dramatically, eliminating much of the pain from previous versions.
- Proper plugin activation and project setup are critical for a successful pipeline.
- Rigging now happens via cloud services, which speeds things up but requires user authentication.
- Animation retargeting is vastly simplified through leader pose copying and blueprint integration.
- LOD and optimization settings matter — tweaking these ensures your Metahuman looks good and runs smoothly in-game.
- This setup enables solo creators to build AAA-quality characters, making next-gen avatars accessible to all.
Timeline Guide
00:00 – Intro to Metahumans and the Challenge in Games
00:33 – Purpose of the Tutorial and Unreal Engine 5.6 Improvements
01:13 – Setting Up the Project and Template
02:35 – Initial Project Configuration
03:18 – Plugin and Installation Requirements
04:02 – Enabling the Metahuman Creator Plugin
04:20 – Creating a New Metahuman Character
05:30 – Key Considerations When Creating a Character
06:24 – Rigging and Cloud Processing Setup
07:16 – Choosing and Editing the Character (Lorenzo)
08:14 – Downloading and Applying Textures
09:09 – Assembling the Character and Preparing for Integration
09:33 – Problems with Old Methods of Integration
10:12 – New Simplified Five-Step Setup
11:01 – Reviewing the Imported Metahuman in UE5
11:18 – Opening and Editing Blueprints
12:02 – LOD and Visual Optimization Tips
13:01 – Copying and Pasting Character Meshes
14:21 – Setting Transformations and Leader Pose Setup
15:29 – Retargeting and Hiding Old Mesh
16:17 – Optimizing Animation Tick Settings
16:49 – Testing and Final Playable Metahuman
17:10 – Custom Rig Adjustments and Closing Thoughts
17:33 – Mentoring and Further Learning Opportunities

Ever since the team at epic released the metahumans, it’s been all the craze across YouTube and the entire internet. I mean, after all, near photorealistic, manipulable characters for cinema and virtual production is a big boon in any creator’s arsenal. The catch, however, is the moment you’re trying to do something with those characters inside of an actual game experience, when the whole thing breaks down because these characters are, by default, not built for that.
Now, it doesn’t mean that you can’t use them for that. It just there’s a few steps. So in today’s video, let’s quickly look at that and get you up and running.
Okay. So this video was a pleasure to make simply because of the release of Unreal Engine 5.6. And the reason it’s such a blessing to make is because in earlier versions of Unreal Engine, the process of getting a metahuman from the metahuman creator over into unreal and then trying to rigged, for example, with the third person character blueprint was an absolute nightmare.
But today we’re going to be looking at another method, and this method is super fast and super quick, and it’ll have you up and running with a metahuman that is completely playable based upon the third person character blueprint inside of your game within a very short period of time. Now, I want to caveat this video with a couple of things I’m not going to cover the mid a human creator.
There’s enough videos out there doing that. I am, however, going to look at just activating the plugins and restarting the engine, and we’re going to focus straight on getting to the meat of this. Anyway, let’s get into it. So very first thing we’re going to do, we’re just going to go to the game’s template. And I mean you can do this on pretty much anyone.
But we’re going to look at the game’s template and we’re going to pick the third person character template. And we’re 5.6. You get you you the benefit of variants now different alternatives that you can pick from. So you can get the the combat, the platform, the side scroller. We’re just going to pick none for now. What we really need is the third person character.
And again you don’t need to actually open up project. You can even do this with an existing project that you can move that in. And we’re just going to call I’m just going to call this, Matt. Two third. So feel free to name that whatever you like. Okay. So we’ve got the project open. This is the new third person project that we’ve got, inside of 5.6.
And as you can see, we’ve got our third person character here, and it can jump and it can run and can do all the very basic stuff. Getting metahumans to animate was quite a mission in the past. Part of this inspiration for this tutorial is from Gorka Ansible. Amazing, amazing YouTube, Unreal Engine teacher. If you’re really looking for some good stuff.
So I’m just going to create a mini humans folder here. And then inside of that, now I think rather just before I kind of step that up, if you’re if you haven’t set up mini humans yet, there’s to if you’ve not worked with metahumans inside of the 5.6 environment, there are certain things that you are going to have to be conscious of.
So firstly, you are going to alongside the install package, you will have to ensure that the metahumans is installed. It is now an additional component, so to speak. If I go to my 5.6 edition and I go to options, you have to make sure that the media you’ve been created for has been installed. If this is not been installed, you are not going to gain access to the media humans, inside of it, because metahumans is now built into Unreal Engine the.
Essentially, you want to go to your plugins. If you haven’t set this up before and you just want to search for metahumans, and then once we’re here, we’re just going to make sure that we are enabling the ones that we need. So this is kind of the utilities that you need. And then this is the new one, the mini humans creator.
So a lot of the kind of features to build the mini humans inside of it, we need this for. So I’m going to enable the other ones, but that’s just because I’m planning on making some other tutorials around that and using the same project for future. If you’re just getting started, you just need that one. And I’m just going to go ahead and hit restart on the engine.
The next thing we’re going to do is we’re just going to go into our media events folder. I’m going to right click on this. You’ll now see that you have mini humans. Again. Make sure you’ve got those first two steps covered. Number one you have to have installed it as an option alongside the engine. So in order to get that option.
And once you do, you’ll get this option. Now, we’ll do a tutorial in the future if everyone is interested in it. On the media, I made a human identity solve. This helps us to bring other mesh data in to set up new mini humans. But we can do that in the future. But for now, all we’re going to do is go to the mini human character.
I’m just going to call it Bob Bob the builder, and then open that up and it’s going to ask us for plugins. Now I’m still going to go ahead and do this, just so I don’t need to worry about it again in the future. And it’ll obviously also ask you to then to restart your engine. You do need to enable that.
Sorry, but you don’t need to restart the engine specifically for this. So I am however going to go restart and save what I’m building. I’m going to say yes just to kind of reopen what I was busy with. Okay, so now we’ve got the minute you means creator inside of, ue5. Which is super cool. Here’s the core stuff that you really need to know about this thing.
I mean, there’s tons of tutorials where people just walk through every single step. I think that’s a little bit redundant because, most people have used a normal character editor, and that’s the super cool thing about, metahumans and how they’re just kind of building that. So you can do quite a lot of really cool things to it.
So the more important stuff that you need to know is obviously you have to build your character. You’ve got to then give it a rig, then you have to download the textures. And once you’ve got those in, then you can actually assemble it. And then you’ve got a media unit inside of your project. So those are the basic steps.
So I’m not going to go ahead and build one with all the details. Obviously you’ve got all of those things you can do the customization, of your characters, the head, the materials, the hair, the entire thing. And you can only do this up until when you create an actual rig. Once you create a rig, if you want to go and modify anything, you are going to have to delete the rig and basically restart.
Okay. So and the other thing to note is using these upper functions, the creating the rig that is going to activate the cloud service, which will require you to authenticate if it’s your first time with your unreal or your mini humans account. So that does get processed in the cloud to help speed things up. So I’m just going to go ahead and I’m going to pick a character that kind of works quite simply.
Let’s see. Let’s take the rings. So I’m just going to double click on on the on Lorenzo here. Like this guy looks like he’s got stories. All right. Cool. Lorenzo. Good to meet you, my man. And there we go. That’s all in. And look, I mean, just a general view. You can kind of modify the lighting on the studio section a lot easier is just if your highest quality.
And then epic is your highest quality in your stuff. So obviously, the further you go down, the worse it’s going, not the worse. But it’s going to not look as crisp as we’ve got it here, because I mean, here, look at that detail. Like, especially if you’re new to many humans. Although I think if you were watching this tutorial, it’s very likely you are familiar with many humans.
You just want to figure out how to get them to play. Okay, cool. So from here on, now that I’ve got that, I’m just going to go hit create. The assets you’re editing is rig pending preset selection. The model operation requires that the rig is deleted to unlock simple rules that not gets all the rigging. Now mine’s automatically started.
This thing can see the progress in the bottom here, you know, 76%. So on you. If it’s the first time, like I said, you will be prompted to log in. But then after that, you should be good to go. Okay. So we’ve got them rigged. Now, if we go through, we’re not going to be able to do it yet because we’re still missing the textures.
So let’s go ahead and let’s pull textures. I’m just going to grab 4K here. I’m not planning on any major high end cinematics with this one okay. Now we’ve got our textures. We can kind of step back to that. It doesn’t auto refresh. He’s going to switch your tabs, go back down, and now we’re pretty much ready to go.
This warning sign is just to remind you that you can’t, modify it any further if you want to rig it. So you’ve got the assembly options here so you can kind of pick your quality. So again, if you’re going to do cinematics definitely take cinema. You’re just going to go gameplay optimized I think is super fine. And I’ll just leave the quality on high.
Again, it really depends on what your use case is going to be. So I’m going to stick to that route and I’m going to stick to that name. I’m happy with it. And now I’m just going to hit a symbol and that will now, get my human, my it’s a human available for me to use in project.
Now there’s been this this one here is probably going to be the easiest route that you take in. In previous times, I’ve looked at so many people trying to get this in, and the typical kind of approach is where they’ll open the middle humans blueprint character, blueprint class. They’ll change the class to a character type. Then they’ll essentially start copying everything over from the third person character.
Because you need a proper static mesh for it. You need animations for it. You also obviously need blueprint logic for it to actually move, but it becomes such a mission. There’s literally cases where you get an error from, from the child component when you actually have to compile it to get that, to find the reference to re update the reference to the new mesh.
It’s it’s an absolute mission. You get to copy the camera and everything over, or you’re going to set up a new camera of a new spring arm. It’s you’re going to fix the references and the bone structure, you to retarget the animation intensity. I mean, you still won’t have to retarget animations, but it is such a process where you’ll see this one.
It’s quite a fast one. In fact, it’s one that we can do in pretty much five steps. Okay. So our our management is now finished compiling. So we should now have him available inside of our project. So now if I’m back in the mid Humans folder I now have my initial character loss. If we go to Bob the builder, there is Bob.
So let’s load up Bob. And we’ve got the typical kind of metahuman, that we would usually have inside of our pieces now. So by default, he’s pretty much set up in terms of using him for normal animation and cinematics, which is really kind of his focus. You can CS wired up with, R kits so we can do facial animations and stuff like that, but obviously we want to use him, pretty much for endgame.
So I’m going to close out on this. And what I’m going to do is I’m going to go to my third person character. And I mean, whenever, wherever you are, you can always just go to your add add feature packed. I can’t do it. And then go to your, third person. And you can bring that in so you can get the benefit of that skeletal mesh and everything.
So I’m going to go into the third person, click my third person character blueprint. And I’m going to open that up. I’m also just going to open up my Bob the builder all here in the same space. And I’m just going to save all. So I’ve got all of this saved in case unreal crashes. I mean 5.6 is still fairly new.
Okay. So the first thing I’m going to do is over in my viewport, I’m actually going to copy, everything over. But before I do that, go to the load sync. And because if I go in on my character, like not all of his details, maybe they’re like, if the eyes are out or of any details are all that’s usually to do with your Lod settings.
So, a good kind of centered is just to like here, I’ve got it basically on minus one, which is going to give me a higher resolution for gameplay, like pretty much a, you know, a one should be fine and a two should be good for like a nice base for your characters. I mean, play around and just kind of see what you like.
What really works for you personally. And I mean, you do want to give the once you make changes, you obviously want to give time for the textures and stuff to load up. And again, just so you’re sure you’re not making those changes on anything, you’re making it on the load sync. So you’ve got it there. And now the next thing we’re going to be doing is we’re going to go ahead and compile that.
But okay. So we’re going to we’re going to basically select everything down here. Now you might want to just open this up when you do that. I don’t know if this is always the case, but definitely is in this version if you have to manually like it doesn’t seem to select everything in the child option, then you don’t need to route just this.
We’re going to hit and copy that. We go over to our third person, go to the mesh. And then just from here on paste it in on the mesh. Now if it comes off down like it did here, just go ahead and drag and drop that.
And this contains our face. So this is something you want. It will so be careful for it’s just a I don’t know it’s a bug that I’m seeing here. But sometimes when you copy these over it changes the names. So you just want to make sure that you’re keeping the same kind of name installed with everything. So we know our route here was actually body.
So just go ahead and rename that.
Now we know the face is still fine. And then this was supposed to just be skeletal mesh and not skeletal mesh. One.
Okay. So just so that it lines up with all of your stuff. So now that you’ve got that in, we’ve got our metahuman in, and we’ve got our, our normal third person character there. And once we’ve got that, I can click on the mesh and I’m just going to go over to the settings and I can pretty much start by just zeroing this out.
So I’m just going to hit zero on, these my location and rotation just so I can get them down to the base position where he should be. And I like to just kind of confine and get this over because I have a big issue of warning signs. Okay. So the next thing, now that we’ve got him in position, we’re going to go over to our construction script.
And this is really kind of where the magic happens. I’m going to just pull out a component called set leader pose, and I’m going to set that leader pose to the to my mesh. And now that I’ve got that set up as my mesh, I’m basically just going to take the rest of my components, of my maybe even my body, my face in a skeletal mesh.
And I’m going to use that, for the target. So I’m going to unclick my mesh. Sorry. And I’m going to take the mesh and just put it there is the leader bone. And then I’m going to pretty much just pull these in and just set them each as a target. All right there we go. And then I’m going to go just compile that.
And I’m going to go back to my mesh view. You can already see. And now you can already see he’s already animated in the same position. So it’s essentially just retargeted in a nice way. So now I’m going to go ahead and click my mesh just so I can pretty much hide that shape of the original character. And I go to search visibility and then just turn all visibility, and then he will be gone.
And then I can also go over into the optimization settings. And here under the optimization, what I want to do is this visibility based animation tick option. It’s currently, as always tick pose. I want to change this to always tick pose and refresh bones. Okay so that looks a bit better. And then I want to go ahead and compile.
Now obviously this game mode already has it’s set up. I’m just going to go up here quickly and just save all. So that’s updated now because the game mode is already set up with the character, third person character. And we’ve essentially now just updated that if I now go ahead and play, there we go. Our nice little, metahuman is now our playable character.
Great. I hope you enjoyed that. And you’ve got yourself up and running. We’ve made it, humans. Now, obviously the benefit of this tutorial sequence is I consciously selected a character preset that was close enough to the third person animations in order for those animations to look fairly natural. Now, that won’t necessarily be the case depending on the type of media you mean you make.
And that would require custom modification of the rig. In order to get those bones to retarget correctly. Please leave a comment below if you’d like to see me cover or going to that, as well as anything else inside of Unreal Engine or its connected software or other tools that work with that. I’ve been thinking about creating a bit of a blender series and exploring other technologies and how to connect these, as well as maybe looking at engine from a software point of view. If you’d be interested in any of those. Also, please do let me know. And if you yourself are looking for a somebody to mentor with or guide you, or if you’re looking for somebody to be that for your company or for your individual brand, please see my information below and hack the hologram. Let me show you how to be a one person, all in one